Snuggly baby blankets

Soooo… the weather is getting cooler here, and so I am getting the urge to work with flannelette again.  Luckily, there are lots of babies arriving too, so I have a great excuse to make some more self-binding baby blankets.

April 2015 034

If you want to know exactly how to make them, check out this old post of mine.

April 2015 033

They can be whipped up in about 1/2 hr to an hour (depending on how fast a sewer you are…), I confess that I always find that cutting the fabric is the part that takes me the longest of all.

April 2015 038

The hardest part now… is prising the finishing product away from my own little girl, so that I can give it away.  Of course, it’s just an excuse to make one more!  Once she felt how snuggly the material was, it was really hard to get her to let go.  I can’t blame her, I suppose.  I’m just as bad!

April 2015 035

Have a great day!

jf

Spools coasters

In the current issue of Love Patchwork and Quilting (issue 13) there’s a bonus kit included for making a set of 4 quilted coasters.  They are made from small spools blocks.  The fabrics aren’t great quality (being honest!) but I thought the pattern was cute and it was a good chance to test out the pattern on fabrics that I wasn’t too emotionally invested in 🙂

coasters

It was a fun block to make, and in much smaller pieces than I would normally use for quilting.  In that sense, it was a good experiment outside of my comfort zone.

Dec 2014 iphone pics and vids 017

It’s a perfect project for chain piecing, and you can get the whole thing done very quickly if you keep you pieces organised by the side of the machine.

Dec 2014 iphone pics and vids 019

The most important tip I can give you is that it is worth taking the time to press the seams of each row of the block in a different direction, so that they lock nicely when it is time to assemble them.  That way, it all comes together neatly.

Dec 2014 iphone pics and vids 018

The wadding that came with the kit was awful – if you are working with the kit, throw it out and use your own.  That said, wadding, and indeed quilting for coasters makes sense.  It’s absorbent, and perfect for preventing pesky puddles in precious places.  (Excuse my alliteration.  I got a bit carried away.)

Here’s the moral to the story:  spools are fun, and this pattern is worth making.  I’ll look forward to whipping up some more in better materials over the summer.  Maybe I will even share them with you!

Have a great day,

xx jf

A little bit of gratitude

I’m so blessed to have some lovely friends.  The person I am thinking of did something very nice for me about a week ago.

I had decided to stop blogging.  I decided that it was not my “core business” and that I had to be more ruthless in the allocation of my time.

In her wonderful, listening, gentle way, she reminded me that expressing my creative side was a really important part of who I am, and that it would be a shame to let that go.  It connected the dots for me so kindly, so that I was able to see how important making and sharing was for my happiness (and mental health!).

I’m a very lucky lady to have people like that in my life.  You know who you are.

Much love.

xx jf

Quick and easy children’s gifts with panels

A friend I love dearly has a sweet little girl.  We have been planning to get together and sew soft books together for… pretty much all of her life.  She is 2 now.

I thought the time had come to just get on with it, even if I was doing it on my own.  It’s not her fault!  As we live on opposite sides of the country our sewing bees are few and far between.

At a craft fair I went to earlier this year I picked up a set of panels for making a soft book.  I hadn’t done one of these before, and so I was a bit apprehensive about getting started, but it was easy.  Ridiculously so!

Mary Dec 2014 iphone 026

I think I had the whole thing done in half an hour or less.  That’s a perfect time frame for whipping something up after my own child has gone to bed (without staying up all night), or for sneaking in a bit of sewing during her nap.

Mary Dec 2014 iphone 024

The only thing that I sometimes find frustrating about working with these sorts of kit projects is that the instructions are often lousy.  These ones weren’t terrible, but the instructions on how to cut out the panels, and whether to allow a seam allowance around the edge of the image or not were a bit lacking.  I decided to cut along the edge of the panel, so that I didn’t risk a dodgy finish if the panel was wobbly or my cutting wasn’t straight.  I didn’t want there to be glimpses of the background fabric!  On reflection, this was probably what the printers intended anyway, as the finish was perfect.

Mary Dec 2014 iphone 025

I think it was a fun, simple project that even a beginner should find gives a fast sense of satisfaction.  I’m sure that the recipient of the books will love them too!

Mary Dec 2014 iphone 027

A final word of advice:  I didn’t read the story before I bought the panels.  It’s pretty grim!  It’s got all the fun stuff: intent to murder, miscarriage, a female character described as “a simpleton”.  Not all kiddy themes, or female-empowering messages.  I will definitely read the panels before I buy again!  Ah well, live and learn.

Have a wonderful day.

JF

Christmas decoration patterns for English paper piecing

Hello hello!

By Christmas time this year I expect that my lovely little daughter will be in her first few weeks of walking.  That’s all very exciting, but it means that our beautiful collection of glass Christmas decorations won’t be making an appearance this year!

Now is the time for me to get an alternate plan in place.  Since I have been bitten by the English paper piecing (EPP) bug, and it’s wonderful portability, I’ve designed a few simple decorations that Mum and I will whip up over the next few weeks.

That way, our tree will still have decorations, but they will be soft and safe for little hands and mouths.

Pics will come in time, but given how hard I found it to find free downloadable patterns that I could just print and cut out, I thought I would share now the patterns for what I came up with.

First, here’s the rough plan of what I’m making.

jfimg-919112732-0001

Here’s the templates for the diamonds that go together to make the star or the snowflake.

img-919113041-0001

Here’s the Christmas tree pattern.  I’ll use different fabric for the trunk, and some embellishments for a star on top, I think.

img-919110935-0001

Here’s the love heart.

img-919111755-0001

Here’s the pointy pentagons.

img-919111613-0001

The templates are nothing fancy, but they are convenient.

If you decide to make some too, please share!  I’ll do the same once I make some progress.

Happy Friday everyone!

jf

“Fresh” block #2

Hello hello…

Fresh block number 2 is now complete.  It took a lot longer than I expected, mainly due to interruptions rather than any particular difficulty with the project.  Here it is!

2014-07-16 09.57.54The process of very carefully trimming each half-square triangle patch to exactly 4.5″ made a huge difference to the ease of assembly and the quality of the points.

There’s one step I haven’t mastered, and that I will need to improve for the next block, and that is making sure that the way I press my seams at the time of putting the 9 patch unit together anticipates the direction that I will need those seams to be in when it comes to joining the four 9 patch units together into a star.  Never mind, I’ve got to have something to work on.

If you’d like to compare block #2 to #1, you can see #1 here.  The fabric I am using in all of them is the Bonnie and Camille Scrumptious layer cake with Bella Solids white.

Happy sewing,

jf

Making the “Fresh” block

I’ve been thinking a lot about the more complex patterns that can be made with simple shapes.  Using just squares and half-square triangles (HSTs), the pattern for the “Fresh” quilt, designed by Camille Roskelley, makes a large, beautiful star.

So of course, I started making one.  It’s the perfect quilt to make with layer cakes and yardage of a background fabric.  I love a good layer cake project!  There’s something about the manageability of a 10″ square that appeals, along with the great variety of prints it permits across the whole of the quilt.

I had a lapse when I made my first quarter-block (I blame the sleepless nights that come with a small child).  I forgot to trim the HSTs to precisely 4.5″ before assembling the 9-patch unit.  Big mistake.  After trying to fiddle with the points a couple of times, I just unpicked the whole thing and started again.  Sigh.  Still, it is a good reminder that I shouldn’t forget, or get slack about, the fundamentals.  Anyway, nothing that the quick-unpick and a bit of time couldn’t fix.

Thereafter, everything went much better.

Here’s what a single block looks like.


20140705-102004-37204863.jpg

It’s pretty big – around 24.5″.  You don’t need to many of these before you have a nice, big quilt!

This block isn’t perfect, but it’s a good start. Sometimes I think a little imperfection is nice.

The pattern is from Camille’s book, Simply Retro.  The fabric I have used is Scrumptious, by Bonnie and Camille, and a Moda Bella Solid in white.

Work and life generally have kept me from the craft room for the last few weeks, but getting back in there to do this block gave me so much joy!  I never regret making time to spend sewing.  I’m so blessed to have a hobby I love, and a place in which to practise it.

With a bit of luck, I’ll get some more time in there this weekend.

jf

Fabulous Fabric Friday: Lotus Pond

This week’s fabulous fabric find is the new Lotus Pond collection by Made by Rae, which is a line designed for Cloud9.

Lotus Pond pic

You can see the many wonderful ways this line can be coordinated at Made by Rae’s blog, here.

I’m a Ginger Monkey has made it into this beautiful cushion.  It made me so inspired to sew, right now!

Lotus Pond cushion by I'm a Ginger Monkey

Here’s the coordinating text fabric Ginger Monkey has used.  It is such a clever coordinate, I think it would go with most modern colourful fabrics as a background.  It’s designed by Alison Glass.

Courtesy of Pink Chalk Fabrics

Now, to get sewing!

Happy Friday, everyone.

jf

Fabulous Fabric Friday: Hello Kitty!

Liberty Art Fabrics are beautiful.  Japanese character Hello Kitty is cute.  What could be better than combining the two?

From what I can tell, these fabrics are only produced in Japan, and so ordering from Etsy is the way to go.

il_570xN_603236860_duqz

Try these sellers:  Par Rui, lilymeru and washimatta.

il_570xN_352703594_rqby

Such detailed, colourful, fun fabric.  It’s a lot of postage from Japan, but probably worth it for something one of a kind.

Happy Friday everyone!

jf


Why shouldn’t face flannels be pretty?

We have a lot of face washers (flannels) in our house.  They’re all plain white… not exciting at all.  Yet, my little one absolutely loves them.  She would play with and chew on them all day, if I would let her.

140

Inspired by Sing All You Want, I decided to make her some pretty ones.  I used a very different method though, so if you were planning on making some too, perhaps check out both posts and see which one will work best for you.

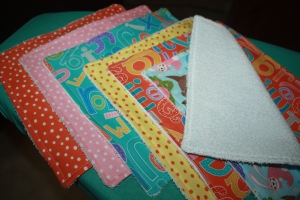
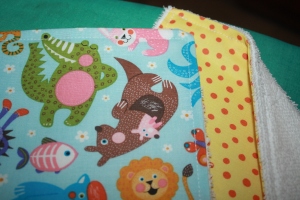
I cut a 10″ square of nice, soft terry towelling, and grabbed a 10″ layer cake square.  I chose some fabrics from ABC Menagerie, a line by Abi Hall for Moda.  It’s colourful, and of excellent quality.

132

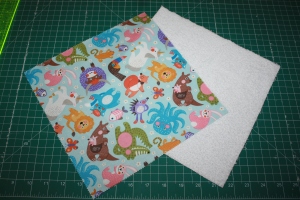
I pinned them right sides together, then sewed around all four sides with a 1/4″ seam, leaving a 4″ gap on one side to be able to turn it through.

133

134

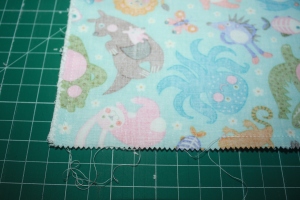
Hopefully you can see the gap I left for turning it through in this picture.

136

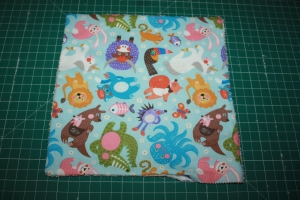
I turned it through so that the right sides were facing out, and used the end of a paintbrush to poke the corners out to be as pointy as possible.  In most sewing projects, I would trim the corners to reduce the bulk and make them pointier, but I was a bit worried about the terry towelling enduring this, so I left the corners untrimmed before turning it through.

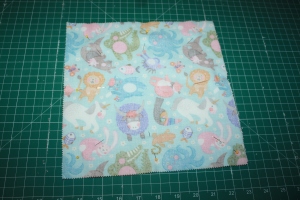
I pressed the item, and pressed the hole so that the fabric and terry towelling looked like the sides that had been sewn.

138

I then did a top-stitch around all four sides, taking care to make sure that the hole is nicely closed up in the process.  I back-stitiched a little at the start and finish to make it nice and strong.

Easy, and done!  They are forgiving enough to be a good project for a less confident seamstress, or to be made very quickly by someone with confidence.

139

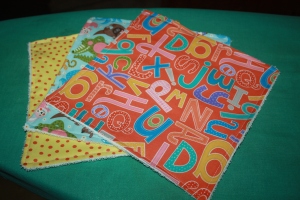
I then got carried away and made a whole pile.  These would make great gifts for new babies, particularly where you don’t feel close enough to give a whole quilt (or if you don’t have time to make a whole quilt!).

My creation was tested out at bath time, and was a hit.  These might become a real staple.

My husband asked how much they cost to make, exclusive of time.  I don’t usually do calculations like these, because all quilters know it is a labour of love, not a penny-pinching exercise.  They always cost so much more than a store-bought blanket would (but that’s not the point, darling!  It’s about the love that goes into them).  Anyway, I did the math, and they work out (fairly conservatively) at AU$1.94 each.  Not cheap, but not expensive for something that is colourful and practical.

Have a great week.

jf