There are few quilts that are easier to take on than a disappearing nine patch. So, over the weekend, I opened up my Daysail layer cake at last, and decided to get cracking on one.
Sometimes people say to me that they don’t like working with layer cakes because there is just too much colour in it for one project. I understand that sentiment sometimes, but often find I get the best results when using a layer cake (or any other pre-cut for that matter) if I make a decision to only use a few of the colours in the pack, and save the rest for another project. That way the few colours you choose to focus on get to shine, and the result is not so overwhelming.
In this case, I decided to use the reds, navys, whites and aquas in the pack, and save the cream, green and teal for another day.
Here’s the method:
1. Cut layer cake slices into 4 x 5″ patches. I cut 21 slices (sometimes in bulk by stacking a few of them up) to make a quilt that will be 6 blocks by 6 blocks (about 41″ square finished size).
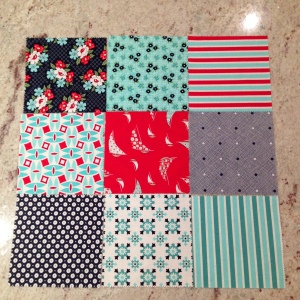
2. Arrange the patches into sets of 9. I like to choose one colour that will always be the centre block in these arrangements. You’ll see why soon. For this project, I chose red to be the centre patch.
3. Sew these blocks together, to form a 9-patch block. Use a 1/4″ seam and press each row in the opposite direction so that the seams nest as you join the rows of the block together
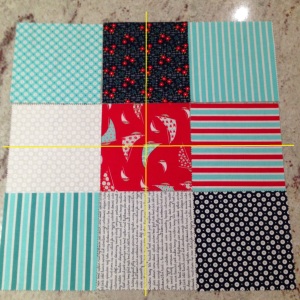
4. After a good press, lay your 9-patch on your cutting mat. You need to measure carefully the centre lines of the block, both vertically and horizontally. I’ve marked approximately the lines you need to locate in yellow on the picture below.  5. Cut the 9-patch block into 4 smaller blocks, along the yellow lines that you have measured. Be as accurate as is possible!
6. You should now have 4 small patches, each with one large square, one small (in my case, red) square and two rectangles. Trim these so that they are of identical size. I trimmed them all to 6 3/4″ square.
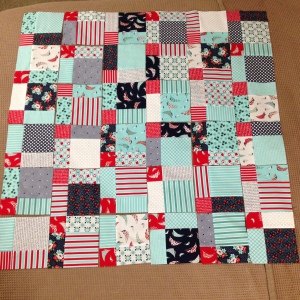
7. Lay out your patches into the arrangement for the quilt. Here’s an example of how you can lay it out, but there is plenty of room for improvisation and experimentation here! I try not to over-think it. In my view, some imperfection is desirable, but each to their own.
8. As you can see, when you choose a single colour for the centre of the 9 patch block, it ends up becoming a common thread in the finished design that brings the whole quilt together. I think it can make an otherwise messy/scrappy design look orderly enough to be pleasing to the eye.
8. Sew together your small blocks into rows. Press the seams in opposite directions.
9. Join your rows together, matching the points where the blocks meet and locking the seams (by having them pressed into opposite directions).
10. Give your masterpiece a good press, cut some backing and wadding to size, baste, quilt and bind!
Enjoy this fun, easy project.
jf

